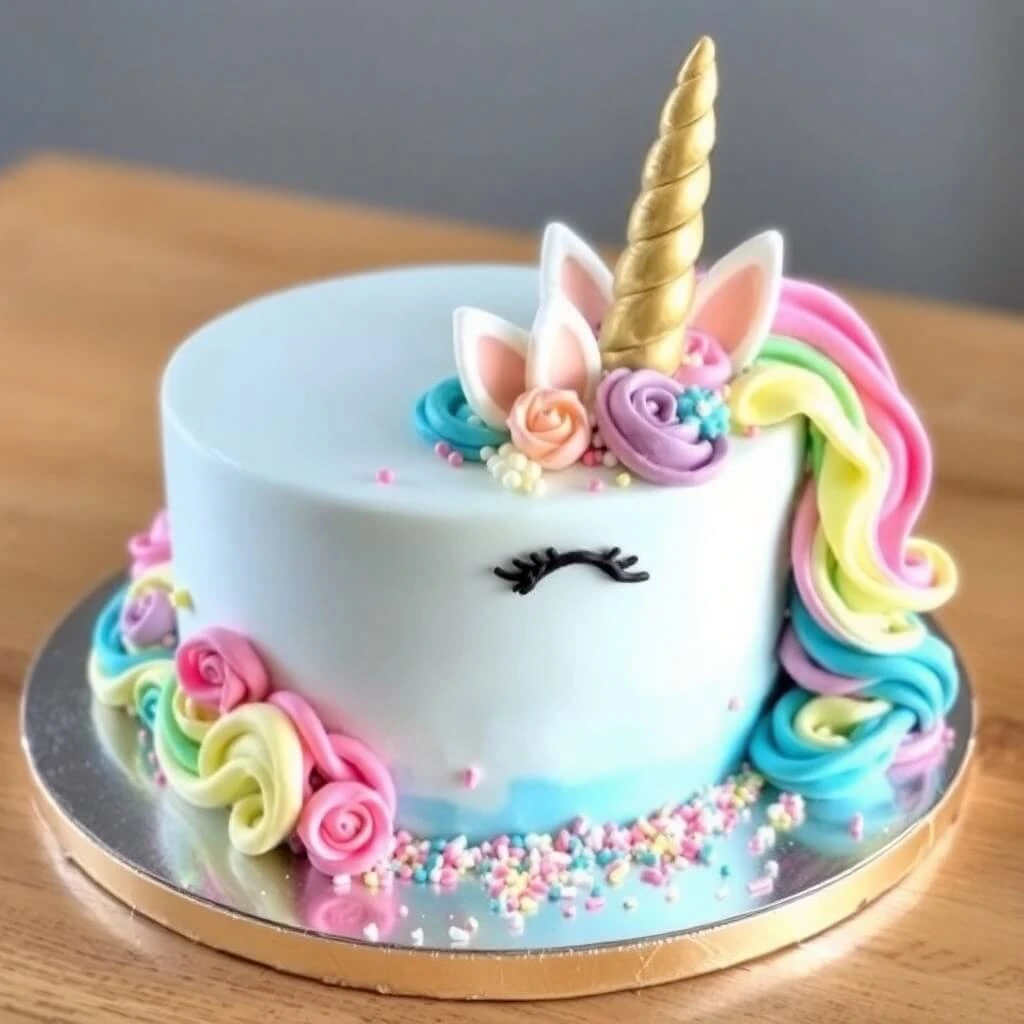
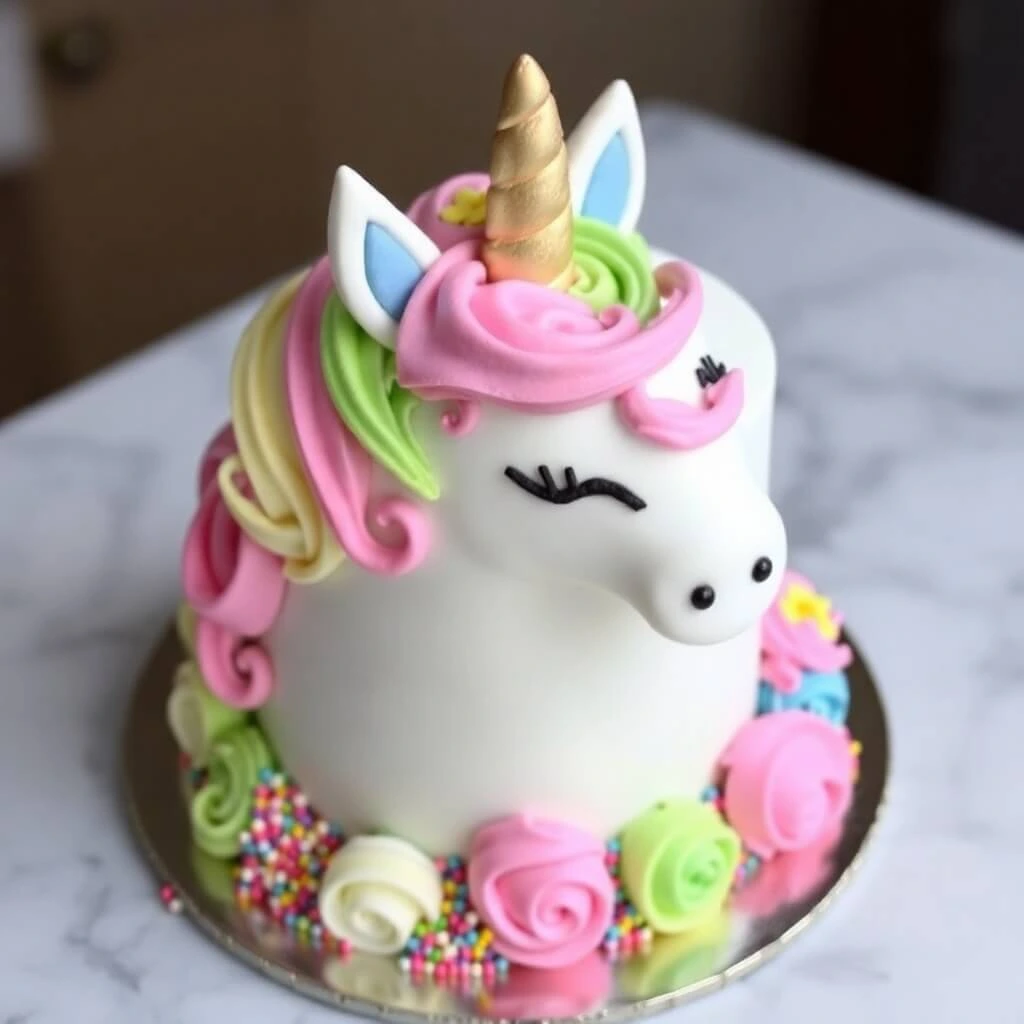
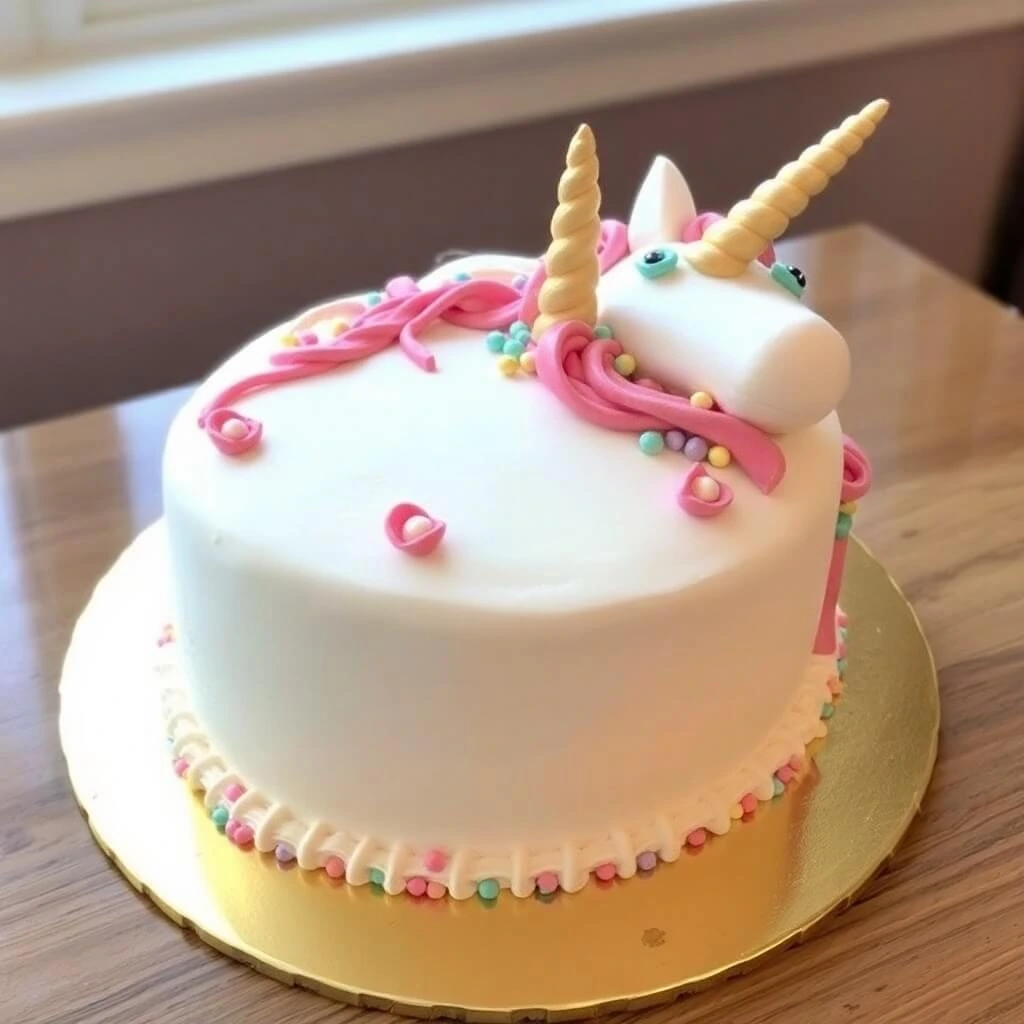
How to make a unicorn cake has become one of the most popular baking questions for special occasions. These magical desserts, known for their whimsical designs and vibrant colors, are perfect for birthdays, baby showers, and other celebrations. With their pastel hues, shimmering details, and playful decorations, unicorn cakes bring a touch of enchantment to any event.
Whether you’re an experienced baker or a beginner, learning how to make a unicorn cake at home can be both fun and rewarding. From creating the rainbow layers to adding the shimmering edible glitter, each step allows you to get creative and craft a dessert that’s just as beautiful as it is delicious.
In this guide, we’ll show you how to make a unicorn cake step by step. With easy instructions, helpful tips, and a little imagination, you’ll soon have a stunning cake ready to impress your guests. Let’s dive into the magic!
Ingredients You’ll Need for the Perfect Unicorn Cake: How to Make a Unicorn Cake
Essential Cake Ingredients for How to Make a Unicorn Cake
Creating the perfect unicorn cake starts with gathering the right ingredients. The quality and freshness of your ingredients play a significant role in the final taste and texture of your cake. Here’s a detailed breakdown of the essential items you’ll need:
1. Base Ingredients for the Cake
- Flour: Choose all-purpose flour or cake flour for a lighter, more tender texture. Sifting the flour before use ensures there are no lumps and helps create a smooth batter.
- Sugar: Granulated white sugar is the standard choice, but you can experiment with superfine sugar for a softer crumb or brown sugar for a slightly richer flavor.
- Eggs: Eggs add structure and moisture to the cake. Ensure they are at room temperature to mix evenly into the batter.
- Butter: Use unsalted butter for better control over the flavor. Creaming the butter with sugar until it’s light and fluffy helps achieve a soft, airy cake texture.
- Baking Powder and Baking Soda: These leavening agents are key to making your cake rise perfectly. Be sure to measure them accurately for consistent results.
- Milk or Buttermilk: Adding liquid ingredients like milk or buttermilk ensures your cake stays moist and soft. Buttermilk also adds a subtle tang that enhances the flavor.
2. Ingredients for Colorful Layers
- Food Coloring: To achieve the signature rainbow layers of a unicorn cake, you’ll need high-quality gel or liquid food coloring. Gel colors are preferred as they provide vibrant hues without altering the consistency of the batter. Popular colors include pastel pink, lavender, turquoise, and yellow.
- Flavor Extracts: Enhance your cake’s flavor with extracts like vanilla, almond, or lemon. A touch of vanilla is a classic choice that complements the magical theme.
3. Frosting Ingredients
- Buttercream Frosting: A unicorn cake wouldn’t be complete without a luscious layer of frosting. To make buttercream, you’ll need unsalted butter, powdered sugar, heavy cream, and vanilla extract. You can tint the frosting in different colors to match your rainbow layers.
- Fondant (Optional): Fondant is often used for detailed decorations like the unicorn horn, ears, or stars. Purchase pre-made fondant or make your own for a more hands-on approach.
4. Decorative Elements
- Edible Glitter: Adds a sparkling, magical touch to your unicorn cake.
- Candy Pearls and Sprinkles: Use pastel-colored sprinkles and candy pearls for a whimsical finish.
- Unicorn Cake Toppers: Pre-made unicorn horns, ears, and eyelashes are widely available and can save time. For a DIY option, use fondant or modeling chocolate to craft these decorations.
By carefully selecting and preparing these ingredients, you set the foundation for a show-stopping unicorn cake that’s sure to impress both visually and in taste.
How to Make a Unicorn Cake: Using Food Coloring for Perfect Rainbow Layers
The hallmark of a unicorn cake is its stunning, colorful layers that reveal a magical rainbow effect when sliced. Achieving vibrant and evenly tinted layers requires the right choice of food coloring and techniques. Here’s everything you need to know about using food coloring to bring your unicorn cake to life:
1. Choosing the Right Type of Food Coloring
Not all food colorings are created equal, and selecting the right type is crucial for achieving the bold, vivid hues associated with unicorn cakes:
- Gel Food Coloring: Gel-based food coloring is the top choice for baking because it delivers concentrated colors without altering the texture of your batter. In fact, a small amount goes a long way, which means your layers will be vibrant while still maintaining the cake’s consistency.
- Liquid Food Coloring: On the other hand, liquid food coloring is widely available and works well for light pastel shades. However, it is less concentrated and may require larger quantities, potentially thinning the batter.
- Powder Food Coloring: If you’re looking to achieve ultra-bright or unique colors, powder food coloring is ideal. Not only does it mix easily into dry ingredients, but it also offers a wide range of hues.
- Natural Food Coloring: For those seeking a healthier option, natural food coloring made from plant-based ingredients, such as beet juice (red), spinach (green), or turmeric (yellow), is an excellent choice. Although the shades are often softer, they add a subtle, organic charm to your cake.
2. How to Mix Food Coloring with Batter
To achieve even, vibrant layers, follow these steps:
- Divide the Batter: After preparing your cake batter, evenly divide it into separate bowls—one for each color you plan to use.
- Add Food Coloring Gradually: Start by adding a small amount of food coloring to each bowl. Use a toothpick or the tip of a spatula to control the amount for gel or powder food coloring.
- Mix Thoroughly: Stir each portion of batter gently but thoroughly until the color is evenly distributed. Avoid overmixing, as this can affect the cake’s texture.
- Adjust Intensity: If the color isn’t as vibrant as desired, add a bit more coloring and mix again until the desired shade is achieved.
3. Popular Color Combinations for Unicorn Cakes
The color palette of a unicorn cake is typically soft and whimsical, but you can customize it to suit your theme:
- Pastel Rainbow: Soft shades of pink, blue, yellow, green, and lavender create a dreamy effect.
- Bold Rainbow: Use brighter versions of classic rainbow colors for a more striking presentation.
- Monochromatic Gradients: Create an ombre effect with varying shades of a single color, such as pink or purple.
4. Tips for Baking Vibrant Layers
- Prevent Color Fading: Some food colorings may fade during baking. To avoid this, use high-quality, heat-stable coloring products.
- Layer Consistency: Ensure each colored batter portion is evenly spread in the pan to create uniform layers.
- Avoid Overbaking: Overbaking can dull the colors. Keep a close eye on the baking time to preserve the vibrancy.
5. Fun Alternatives for Colorful Layers
If you want to experiment beyond traditional food coloring, try these creative ideas:
- Tie-Dye Effect: Swirl multiple colors into a single layer for a psychedelic, tie-dye appearance.
- Confetti Layers: Add colorful sprinkles to the batter for a fun surprise inside the cake.
- Gradient Layers: Gradually change the intensity of a single color across layers for a stunning ombre effect.
Using food coloring effectively is key to achieving the iconic rainbow layers of a unicorn cake. With a little creativity and attention to detail, you can craft a visually stunning cake that will wow your guests when you make the first slice.
Frosting and Decorations: How to Make a Unicorn Cake Look Stunning
No unicorn cake is complete without dreamy frosting and magical decorations. These elements transform a simple cake into a whimsical masterpiece that steals the show at any celebration. Here’s how to create and apply frosting, along with tips for stunning decorations to elevate your unicorn cake to the next level.
1. Choosing the Right Frosting
Frosting is the foundation for creating a smooth and colorful exterior on your unicorn cake. Here are popular options to consider:
- Buttercream Frosting
- The most popular choice for unicorn cakes due to its creamy texture and ease of use.
- Can be easily tinted with gel food coloring to create vibrant or pastel hues.
- Perfect for piping intricate designs like swirls, rosettes, and the unicorn mane.
- Key Ingredients: Unsalted butter, powdered sugar, heavy cream, vanilla extract.
- Fondant
- A smooth and pliable option for covering the entire cake or crafting detailed decorations.
- Ideal for creating the unicorn’s horn, ears, and other sculpted elements.
- Pre-made fondant is convenient, but you can make it at home with marshmallows and powdered sugar.
- Cream Cheese Frosting
- Adds a tangy flavor to balance the sweetness of the cake.
- Best for cakes that need minimal decoration, as it’s softer and less sturdy for intricate designs.
2. Frosting Techniques for a Perfect Finish
- Crumb Coat
- Start by applying a thin layer of frosting (crumb coat) to seal in the crumbs.
- Chill the cake for 20-30 minutes to set the crumb coat before adding the final layer.
- Smooth Finish
- Use a cake scraper or spatula to apply the final coat of frosting smoothly. Rotate the cake on a turntable for an even finish.
- Textured Designs
- Create waves, stripes, or ruffles with specialized spatulas or combs for a unique look.
- Ombre Frosting Effect
- Blend two or more colors of frosting together for a gradient effect that matches the unicorn theme.
3. Magical Unicorn Decorations
Decorations are the highlight of the unicorn cake, adding the iconic features that make it truly enchanting:
- Unicorn Horn
- Craft the horn using fondant or modeling chocolate. Roll it into a cone shape, twist it for a spiral effect, and paint it with edible gold or silver luster dust for a shiny finish.
- Ears and Eyelashes
- Use fondant to sculpt the ears, adding a smaller colored piece inside for detail.
- Pipe black buttercream or use edible markers to draw elegant unicorn eyelashes on the cake.
- Unicorn Mane
- Pipe swirls, rosettes, and stars using different colored buttercream to create a flowing mane. Popular colors include pastel pink, blue, lavender, and yellow.
- Add edible glitter, candy pearls, or small fondant flowers for extra flair.
- Sprinkles and Glitter
- Sprinkle edible glitter, stars, or confetti around the base and top of the cake for a magical touch.
- Themed Cake Toppers
- Use pre-made unicorn cake toppers, like figurines or custom signs, to simplify the decoration process.
4. Tips for Decorating Success
- Plan Ahead
- Prepare decorations like the horn, ears, and fondant details in advance to allow them to set and harden.
- Use the Right Tools
- Invest in quality piping bags, tips, and spatulas for precise designs.
- Be Patient
- Take your time when frosting and decorating to achieve a polished look. Mistakes can be fixed with a bit of creativity!
- Match the Theme
- Coordinate the colors and designs with the theme of the party or event. A pastel unicorn cake is perfect for kids, while metallic accents work well for an elegant adult party.
5. Alternative Decoration Ideas
- Mini Unicorn Cupcakes
- Make individual cupcakes decorated with mini fondant horns and colorful frosting.
- Drip Cake Design
- Add a white or pastel-colored chocolate drip for a trendy finish.
- Confetti Explosion
- Use sprinkles or edible confetti inside the cake for a fun surprise when sliced.
With the right frosting and decorations, your unicorn cake will look as magical as it tastes. These finishing touches not only enhance the cake’s visual appeal but also add personality and charm, making it the star of any celebration.
Tools and Equipment You’ll Need to Master How to Make a Unicorn Cake
Making a unicorn cake requires more than just ingredients; having the right tools and equipment ensures your cake turns out perfectly shaped, well-decorated, and professional-looking. Below is a detailed guide to the essential tools you’ll need and how to use them effectively.
1. Baking Tools for Perfect Cake Layers
- Cake Pans
- Opt for round cake pans of equal size (8-inch or 9-inch) to ensure uniform layers.
- Consider purchasing multiple pans to bake all layers at once, saving time.
- Mixing Bowls
- Use large, sturdy mixing bowls for preparing the batter. Multiple bowls are helpful for dividing and coloring batter for rainbow layers.
- Whisk and Spatulas
- A whisk is ideal for blending ingredients smoothly.
- Silicone spatulas are perfect for scraping down the sides of bowls to ensure no batter goes to waste.
- Electric Mixer
- A hand or stand mixer is essential for creaming butter and sugar, whipping egg whites, and mixing frosting to the perfect consistency.
2. Tools for Layer Assembly and Stability
- Cake Leveler or Serrated Knife
- Use a cake leveler to trim uneven tops from your layers, ensuring a stable, flat surface for stacking.
- Cake Board or Cake Stand
- A sturdy cake board provides a solid base for building and decorating the cake.
- A rotating cake stand allows for smooth frosting application and easier decorating.
- Offset Spatula
- An offset spatula is a must-have for spreading frosting evenly across layers and creating smooth edges.
3. Frosting and Piping Tools
- Piping Bags and Tips
- Use disposable or reusable piping bags to create intricate designs.
- Assorted piping tips (star, round, leaf) are perfect for piping swirls, rosettes, and the unicorn mane.
- Bench Scraper or Icing Smoother
- A bench scraper helps achieve smooth, polished sides on your frosted cake.
- Essential for creating a professional look.
- Food Coloring Tools
- Toothpicks or small spatulas are useful for adding precise amounts of food coloring to your batter or frosting.
4. Decoration-Specific Tools
- Fondant Tools
- A rolling pin is essential for flattening fondant to cover the cake or create decorations like the unicorn horn and ears.
- Fondant cutters and shaping tools help craft intricate details.
- Paintbrushes (Food-Safe)
- Use food-safe brushes to apply edible glitter or luster dust to fondant decorations like the unicorn horn.
- Edible Markers
- Great for drawing eyelashes or small details directly onto fondant or frosting.
5. Miscellaneous Essentials
- Cooling Racks
- After baking, place cake layers on cooling racks to allow them to cool evenly and prevent sogginess.
- Measuring Cups and Spoons
- Accurate measurements are critical for a successful cake. Use separate sets for wet and dry ingredients.
- Paring Knife
- Handy for trimming fondant, shaping decorations, or making precise cuts.
- Toothpicks or Skewers
- Use them to test if your cake layers are fully baked. Skewers can also help secure the unicorn horn and other tall decorations.
6. Bonus Tools for Added Ease
- Turntable with Locking Mechanism
- Allows for easy rotation while decorating but locks in place when needed for stability.
- Cake Dowels or Straws
- Use dowels to stabilize multi-tiered unicorn cakes, preventing layers from sliding.
- Cake Carrier
- A cake carrier protects your unicorn cake during transportation to a party or event.
Tips for Using Your Tools Effectively
- Preparation
- Lay out all tools and equipment before you start baking to streamline the process.
- Clean as You Go
- Keep tools clean, especially when switching between colors or frostings.
- Practice Piping Designs
- Test your piping skills on parchment paper before decorating the actual cake.
Having the right tools and equipment at your disposal makes creating a unicorn cake an enjoyable and stress-free experience. With these essentials, you’ll be ready to bake, assemble, and decorate a magical cake that’s sure to impress!
Step 1 – Baking the Cake Layers
Preparing the Batter
The batter is the foundation of any cake, and for a unicorn cake, it’s crucial to achieve a light, moist, and flavorful base. Preparing the batter correctly will ensure that your layers rise evenly and hold their shape, making them perfect for stacking and decorating. Below is an in-depth guide to preparing the batter for a successful unicorn cake.
1. Gather All Ingredients and Tools
Before starting, make sure you have all your ingredients measured and ready to go. This will streamline the process and ensure you don’t forget any key ingredients. Also, gather your mixing tools—like mixing bowls, whisks, and spatulas—so you’re set for efficient preparation.
2. Creaming Butter and Sugar
One of the most important steps in cake-making is creaming the butter and sugar. This process incorporates air into the batter, which is vital for a light, fluffy texture.
- Start with Room Temperature Ingredients: Ensure that both the butter and eggs are at room temperature. Cold butter can cause the batter to be lumpy and prevent proper aeration.
- Beat the Butter and Sugar: In a large mixing bowl, combine softened butter and sugar. Using a hand or stand mixer, beat the butter and sugar together on medium speed for about 3-5 minutes, until the mixture is light, fluffy, and pale. This process helps create the structure for your cake and ensures a soft crumb.
- Scrape the Bowl: Occasionally stop the mixer and scrape down the sides of the bowl to make sure all ingredients are fully incorporated.
3. Incorporating the Eggs
Eggs provide structure, moisture, and richness to the batter. They also act as a binding agent for the dry and wet ingredients.
- Add Eggs One at a Time: Crack the eggs into a small bowl and add them to the butter-sugar mixture one at a time, mixing well after each addition. This helps prevent the batter from curdling.
- Mix Until Just Combined: Overmixing the eggs can cause the cake to become dense, so be careful to only mix until the eggs are fully incorporated into the batter.
4. Adding Dry Ingredients
Dry ingredients, such as flour, baking powder, and salt, provide the structure and rise for your cake. It’s important to measure them accurately and sift them to ensure a smooth batter and avoid lumps.
- Sift Dry Ingredients: Sift your flour, baking powder, and salt into a separate bowl to eliminate any lumps and ensure the dry ingredients are evenly distributed.
- Alternate Adding Dry and Wet Ingredients: Gradually add the sifted dry ingredients to the wet mixture, alternating with milk or buttermilk (or another liquid). Start and end with the dry ingredients. Mixing in this order helps prevent overmixing, which could lead to a dense cake.
- Mix on Low Speed: Mix the dry and wet ingredients on low speed or gently fold them in with a spatula to avoid overworking the batter. Overmixing the batter can activate the gluten in the flour, resulting in a tough cake.
5. Achieving the Right Consistency
The consistency of your batter should be smooth, with a slight flow but not too runny. If it’s too thick, it won’t spread evenly in the cake pan; if it’s too thin, it could lead to a dense cake.
- Check Consistency: Use a spatula to lift the batter. It should fall slowly off the spatula in a thick ribbon. If the batter seems too thick, add a little more milk or buttermilk to loosen it up.
- Avoid Overmixing: Once the batter reaches the right consistency, stop mixing. Overmixing will cause the cake to be tough.
6. Dividing the Batter for Color
To create the iconic rainbow layers for your unicorn cake, you’ll need to divide the batter into several portions. Here’s how to divide the batter evenly and add color:
- Divide the Batter Evenly: Use a kitchen scale or measuring cups to divide the batter into separate bowls, one for each color you plan to use.
- Add Food Coloring: Use gel or liquid food coloring to tint each portion of the batter. Start with a small amount and mix until you achieve the desired color. Add more food coloring as needed to get vibrant shades. Gel colors are highly concentrated, so a small amount goes a long way.
- Be Gentle: Mix the food coloring into each portion of batter gently to avoid deflating it. Ensure the color is evenly distributed without overworking the batter.
7. Preparing the Cake Pans
Before pouring the batter into the pans, it’s essential to prepare the pans to prevent the cake from sticking.
- Grease and Flour the Pans: Grease the pans with butter or cooking spray, then dust them lightly with flour. You can also line the bottoms with parchment paper for extra insurance.
- Pour the Batter: Pour the colored batter into the pans in layers, or alternate the colors for a marble or swirl effect. If you’re making a multi-layer cake, make sure to pour the same amount of batter into each pan for uniform layers.
8. Final Check and Baking
- Smooth the Batter: Use a spatula to smooth the top of the batter to ensure even baking.
- Tap the Pans: Gently tap the pans on the counter to remove any air bubbles.
- Bake: Preheat your oven to the correct temperature, usually around 350°F (175°C). Bake the layers for the time specified in your recipe (typically 25-35 minutes), checking doneness by inserting a toothpick into the center of the cake. If it comes out clean, the cakes are ready to be removed from the oven.
Tips for a Perfect Batter
- Use Fresh Ingredients: Make sure your baking powder, flour, and other dry ingredients are fresh to ensure optimal rising.
- Room Temperature Ingredients: For the best texture, use room temperature eggs, butter, and milk to help everything incorporate smoothly.
- Don’t Overmix: Overmixing the batter can lead to a dense, tough cake. Mix just until combined.
- Even Color Distribution: When adding food coloring, ensure the color is evenly mixed into the batter to avoid streaks in the layers.
Preparing the batter is a crucial step in making a perfect unicorn cake. Following these tips and steps will help ensure that your cake layers come out moist, light, and beautifully colored—ready to be stacked and decorated into a magical masterpiece!
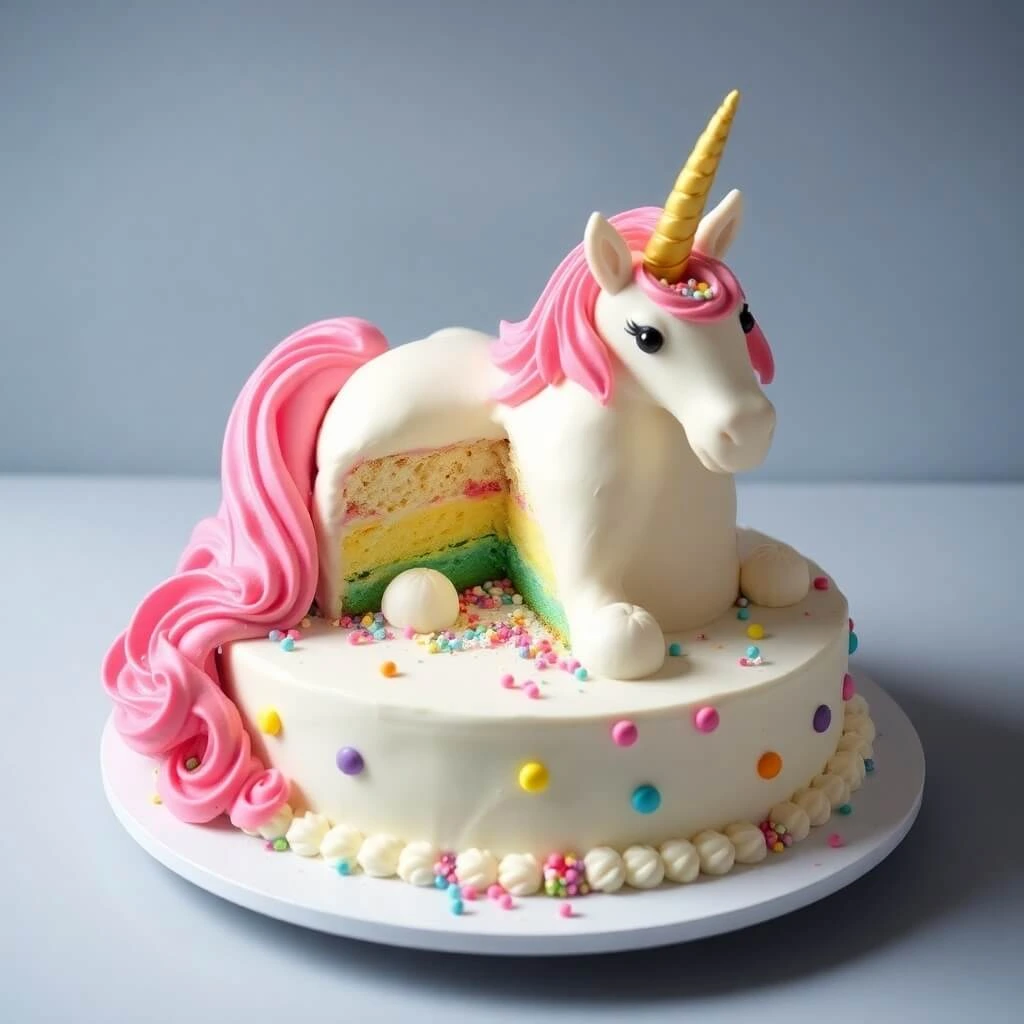
Creating Rainbow Layers
Creating rainbow layers is one of the most exciting and visually striking parts of making a unicorn cake. The vibrant, colorful layers inside the cake are what make it truly magical and unique. Here’s an in-depth guide on how to achieve perfectly even, beautifully colored rainbow layers that will dazzle your guests when you slice the cake.
1. Preparing the Batter for Rainbow Layers
Before diving into coloring the batter, it’s essential to prepare the base batter properly to ensure smooth and consistent layers. Here’s a quick recap of the steps:
- Mixing the Batter: Follow the recipe carefully and ensure that the batter is smooth and lump-free. Once your batter is ready, divide it into equal portions. The number of portions will depend on how many colors you want for your rainbow layers.
- Choose the Right Amount of Batter: For a typical 6-layer rainbow cake, divide your batter into six equal portions. If you’re making a larger cake or want more vibrant layers, you can divide the batter into more portions.
2. Adding Food Coloring to Achieve Bright, Vibrant Colors
Food coloring is the magic ingredient that turns plain batter into a rainbow masterpiece. The key is to use high-quality food coloring and mix it thoroughly to achieve even and vibrant hues.
- Selecting Food Coloring: Gel food coloring is the best option for achieving bold, vibrant layers. Liquid food coloring can work, but it tends to thin the batter and may not provide the same intensity of color.
- Mixing the Colors: Start by adding a small amount of food coloring to each portion of batter and mix well using a spatula or whisk. Gradually increase the amount of food coloring until you reach the desired intensity for each color.
- Tips for Colors: For a classic rainbow cake, use red, orange, yellow, green, blue, and purple. You can also experiment with pastel shades or go for a monochromatic theme with different shades of one color.
- Avoid Over-Mixing: Mix the batter gently after adding the food coloring to prevent deflating the cake batter, which could lead to dense layers.
3. Layering the Colors in the Cake Pans
Once your batter is evenly colored, it’s time to layer the colors in the cake pans. This step is crucial for achieving the clean, distinct layers that make your unicorn cake visually stunning.
- Grease and Line the Cake Pans: Grease and flour the cake pans to ensure the layers don’t stick when baking. You can also line the pans with parchment paper for extra security.
- Spoon the Batter into the Pans: Begin by spooning the first color of batter into the center of the pan. Don’t spread it out; simply allow the batter to settle in the center.
- Layering the Colors: Add each additional color on top of the previous one, making sure that each spoonful is placed directly in the center. The batter will naturally spread to the edges of the pan, creating the layered effect. Be careful not to mix the colors together—allow each one to remain distinct.
- For a Neat Look: Use a spatula to gently smooth the top of each layer of batter if needed, ensuring the batter is even across the pan.
4. Swirling Effect (Optional)
If you prefer a more artistic and fluid look for your rainbow layers, you can create a beautiful swirl effect instead of clean, distinct layers. Here’s how:
- Alternate the Colors: As you add the colored batter into the pans, add small dollops of each color in a random pattern, alternating between them.
- Create the Swirl: Once all the colors are in the pan, use a skewer or toothpick to gently swirl the batter in a figure-eight motion. This will blend the colors together to create a marbled effect.
- Don’t Overdo It: Be sure not to over-swirl the batter. The goal is to create beautiful swirls without blending the colors completely. You want some definition between the colors, even with the swirls.
5. Baking the Rainbow Layers
Baking the layers properly is just as important as creating them. Uneven baking can cause your rainbow layers to bake unevenly, which can affect their overall appearance and texture.
- Preheat Your Oven: Make sure your oven is preheated to the correct temperature (usually around 350°F or 175°C).
- Bake Evenly: Place the pans in the center of the oven to ensure even heat distribution.
- Monitor the Baking Time: Bake the layers for the time specified in your recipe, typically between 20-30 minutes, but check by inserting a toothpick into the center of the cake. If it comes out clean or with just a few crumbs, the cakes are done.
- Don’t Open the Oven Door: Avoid opening the oven door too early to prevent the cakes from collapsing. Check on them only in the last 5-10 minutes of baking.
6. Let the Layers Cool Properly
Cooling the layers is essential to prevent them from becoming too soft or falling apart when you try to remove them from the pans.
- Cooling in the Pans: Once the cakes are done baking, allow them to cool in the pans for 10 minutes. This makes it easier to remove them without breaking.
- Transfer to Cooling Racks: After 10 minutes, carefully remove the cakes from the pans and transfer them to cooling racks to cool completely before frosting. This prevents the frosting from melting when it’s applied to warm cake layers.
7. Assembling the Cake
Once your rainbow layers have cooled completely, it’s time to stack and assemble your unicorn cake.
- Trim the Layers (Optional): If necessary, level the tops of the cake layers to ensure a smooth, even surface for stacking.
- Stack the Layers: Begin with the first layer on a cake board or stand and frost between each layer. Repeat for the remaining layers.
- Frost the Sides: Once all layers are stacked, apply a crumb coat to seal in any loose crumbs, and then add a final smooth layer of frosting.
8. Troubleshooting Common Issues
- Uneven Layers: If your layers bake unevenly, make sure your oven racks are positioned properly and that you’re not overcrowding the pans. If necessary, rotate the pans halfway through the baking process.
- Colors Bleeding: If you notice that the colors are bleeding into each other, this could be due to over-mixing the batter after adding the food coloring or swirling too much. To avoid this, be gentle when mixing and layering the colors.
Tips for Perfect Rainbow Layers
- Use Gel or Paste Food Coloring: These provide stronger and more vibrant colors than liquid food coloring.
- Work Quickly: Once the batter is divided and colored, try to work quickly to prevent it from setting before you can layer it into the pans.
- Equal Portioning: Use a kitchen scale or measuring cups to divide your batter into equal portions for even layers.
- Layer from the Center: Always spoon the batter into the center of the pan for each color to avoid disturbing the previous layers.
Creating rainbow layers for a unicorn cake is a fun and visually stunning process that takes your cake to the next level. By following these steps carefully, you’ll have perfect, colorful layers that will make your unicorn cake a true showstopper at any celebration.
Baking the Layers Perfectly
Baking your cake layers to perfection is essential for ensuring that your unicorn cake is not only visually stunning but also moist and delicious. Whether you’re crafting a multi-layer cake with vibrant rainbow colors or opting for a simpler design, mastering the art of baking is key. This not only ensures that your cake will hold up under frosting and decorations, but it also guarantees a delightful texture. To help you achieve this, here’s an in-depth guide on how to bake the perfect cake layers for your unicorn cake:
1. Preheat the Oven Thoroughly
Before you start baking, always preheat your oven to the required temperature, typically around 350°F (175°C) for most cake recipes. This ensures that your cake will bake evenly and rise properly right from the start.
- Why Preheating Matters: When you place your batter into the oven, a preheated oven allows the ingredients to react and begin baking immediately, which helps to form the cake’s structure. If the oven isn’t preheated, the cake may bake unevenly, affecting texture and rise.
- Oven Hot Spots: Every oven has hot spots—areas that are hotter than others. To avoid this, consider rotating your pans halfway through baking to ensure even cooking. If you have an oven thermometer, it can help you detect any discrepancies in temperature, ensuring your cake doesn’t bake too fast or too slow.
2. Preparing the Cake Pans
The way you prepare your pans is just as important as the recipe itself. Proper preparation helps the cake release easily after baking and ensures it bakes evenly.
- Grease and Flour the Pans: First, grease your pans with butter or oil. Then, lightly flour them to create a non-stick surface, or alternatively, line the bottoms with parchment paper. This ensures that once the cakes are done, they won’t stick to the pans and can easily be removed.
- Use Parchment Paper: Parchment paper not only helps with easy removal but also guarantees that the bottom of your cake stays intact without sticking. Trace the bottom of your pans on the paper and cut out circles to fit.
- Optional: Cake Release Spray: If you want a foolproof method, use a non-stick cake release spray that combines both grease and flour, making it even easier to remove the cakes.
3. Distributing the Batter Evenly
For perfectly baked layers, it’s important that the batter is evenly distributed between all your pans. This ensures that the cake layers rise uniformly, giving you smooth, level layers that stack perfectly.
- Measure the Batter: Using a kitchen scale is a great way to divide the batter equally into the cake pans. Weigh the total amount of batter and then divide by the number of pans you’re using. This ensures that each pan has an equal amount, helping to avoid uneven layers.
- Level the Batter: Once you’ve poured the batter into each pan, use an offset spatula or a spoon to smooth and level the top of the batter. This prevents one side from rising higher than the other and gives you flat, uniform layers.
- Avoid Overfilling: Don’t fill the pans more than halfway. The batter will expand as it bakes, and overfilling could result in batter spilling over, or cakes that are too thick and take longer to bake.
4. Baking Time and Temperature
Getting the right temperature and timing is key to baking perfect cake layers. The wrong baking time or temperature can lead to overcooked or undercooked layers, which may not hold up under frosting.
- Baking Time: Most cakes bake at 350°F (175°C), but depending on the recipe and the size of your pans, baking times can vary. Typically, a cake will take 20–30 minutes, but always start checking the cake around 20 minutes to avoid overbaking.
- Toothpick Test: After the suggested baking time, use a toothpick or cake tester to check for doneness. Insert the toothpick into the center of the cake—if it comes out clean or with just a few moist crumbs, the cake is done. If it comes out with wet batter, the cake needs more time.
- Rotate the Pans: If you’re baking multiple layers, rotate the pans halfway through the baking time to avoid uneven baking. This ensures that the heat circulates evenly across each pan.
5. Checking for Properly Baked Layers
It’s important to check that your cakes are properly baked, as underbaked or overbaked layers will affect the texture and stability of your unicorn cake.
- Spring Test: Once the recommended baking time has passed, lightly press your finger in the center of the cake. If the cake springs back and doesn’t leave an indentation, it’s ready. If your finger leaves a dent, give it a few more minutes.
- Golden Brown Edges: The edges of your cake layers should pull slightly away from the sides of the pan when they are done. This is another visual cue that the cakes are cooked through. The top of the cake should have a light golden brown color, signaling that it’s fully baked.
- Slight Dome: It’s common for cake layers to rise into a slight dome as they bake. This is usually fine, but if the dome is too pronounced, you may want to trim it to ensure a level top for stacking.
6. Cooling the Cake Layers
Proper cooling is crucial to ensure the layers don’t collapse or become too crumbly when you try to frost them.
- Cool in the Pans: Let the cakes cool in the pans for about 10–15 minutes after removing them from the oven. This allows the cakes to firm up slightly and makes them easier to remove from the pans.
- Remove from Pans Gently: After the initial cooling period, carefully run a butter knife or offset spatula along the edges of the cake to loosen it from the sides of the pan. Gently invert the pan onto a wire rack and remove the pans. If you used parchment paper, peel it off carefully.
- Cool Completely: Allow the cakes to cool completely on a wire rack before frosting. If you try to frost a warm cake, the frosting could melt and slide off, creating a mess. Cooling also allows the structure to set, giving you a sturdier base for decorating.
7. Optional: Leveling the Cake Layers
Sometimes, your cakes will bake with a slight dome or uneven surface. While this isn’t a major issue, leveling the cake layers can provide a more professional and stable base for stacking.
- Serrated Knife Method: Using a serrated knife, carefully trim the dome off the top of the cake to make it flat. Hold the knife at a slight angle and slowly cut through, following the natural curvature of the cake.
- Cake Leveler Tool: If you prefer a more precise approach, use a cake leveler, which is a tool designed to evenly trim cake layers to the exact height you want.
8. Troubleshooting Common Baking Problems
Sometimes, even with the best preparation, issues can arise during baking. Here are some common problems and solutions:
- Cake Sinks in the Middle: This can happen if the oven door was opened too early, causing a sudden drop in temperature. It can also happen if the cake was underbaked. To avoid this, make sure your cake is fully cooked and avoid opening the oven door during the first 20 minutes.
- Dry Cake: Dry cakes can result from overbaking or from not adding enough moisture to the batter. To prevent this, check your cakes early and remove them from the oven once a toothpick comes out clean. Also, avoid over-mixing the batter, as this can result in a tough texture.
- Uneven Baking: If one side of the cake is overbaked or underbaked, this could be due to uneven oven heat. Try rotating your pans halfway through the baking process to ensure even heat distribution.
Baking the layers of your unicorn cake perfectly sets the stage for creating a stunning and delicious dessert. By following these tips and ensuring an even rise, proper cooling, and correct baking time, you’ll have layers that not only look great but also hold up to frosting and decorations, ensuring your unicorn cake is as visually impressive as it is tasty.
Cooling and Stacking Tips
Once your unicorn cake layers are baked to perfection, the next critical steps are cooling and stacking them. Cooling your cakes properly ensures they don’t become too fragile or misshapen during the stacking and frosting process. Stacking, on the other hand, involves carefully layering the cakes with precision so that they hold their shape and make your unicorn cake look flawless. Here’s an in-depth guide to cooling and stacking your cake layers:
1. Cooling the Cake Layers Properly
Cooling your cake layers is a step you don’t want to rush. Proper cooling ensures that your cake holds its shape, and the frosting doesn’t melt due to residual heat. If done incorrectly, the layers can become too fragile to stack or frost.
- Let the Cakes Rest in the Pan: After removing your cake layers from the oven, allow them to cool in the pan for about 10 to 15 minutes. This helps them firm up a little, making it easier to remove them without breaking. Letting them rest also prevents the cake from sticking to the edges of the pan, especially if you haven’t used parchment paper.
- Remove from Pans Carefully: Once the initial cooling period is over, run a butter knife or offset spatula around the edges of the cake to loosen it from the sides of the pan. If you’ve used parchment paper, gently peel it away from the edges. Then, carefully invert the pan onto a wire rack and gently lift it off. Let the cakes cool completely before you proceed with frosting or stacking.
- Use a Cooling Rack: After removing the cakes from the pans, place them on a wire cooling rack. This allows air to circulate around the entire cake, cooling it more quickly and evenly. Never leave cakes in the pan for too long, as they can sweat or become soggy from trapped moisture.
2. Leveling the Cake Layers
Most cake layers bake with a slight dome, which is natural, but leveling the layers ensures a stable foundation for your unicorn cake and gives a polished look. This step is particularly important for stacked cakes, as uneven layers can make the cake unstable and prone to toppling over.
- Use a Serrated Knife: A serrated knife or a cake leveler is ideal for leveling your cake layers. Carefully trim off the domed top of each cake layer by holding the knife horizontally and gently sawing through the top. This will leave you with a flat, even surface on which to build the next layer.
- Stabilize with a Cake Leveler: If you’re not comfortable using a serrated knife, or if you’re looking for a more precise method, a cake leveler tool is a great option. This tool allows you to adjust the height and ensures that each cake layer is leveled uniformly.
- Be Gentle: When leveling the cakes, take your time and don’t rush. Applying too much pressure could cause the cakes to crack or break. Use a gentle hand to ensure a smooth, even cut.
3. Assembling the Layers
Stacking your cake layers properly is essential to ensure the cake is structurally sound and that it looks great when decorated. If the layers aren’t stacked carefully, the weight of the cake can cause it to shift or collapse, especially if it’s tall.
- Use a Cake Board or Base: Place a sturdy cake board or a flat surface (such as a large plate or cake stand) on which to build your unicorn cake. This provides stability during stacking and ensures you can move the cake easily once it’s assembled. If you’re planning to transport the cake, a cake board is especially helpful.
- Apply a Layer of Frosting First: Before stacking, spread a thin layer of frosting on the cake board or plate where the first layer of cake will sit. This helps “glue” the first layer in place and prevents it from sliding around as you stack the other layers.
- Start with the Largest Layer: If you’re using cake pans of different sizes, always start with the largest cake layer as the base. It provides the best support for the smaller layers above it. Ensure that each layer is aligned properly with the others to create a stable structure.
- Use a Cake Turntable: If possible, use a cake turntable to make stacking easier. It allows you to rotate the cake as you build, making it easier to keep your layers centered and level.
4. Frosting Between Layers
To ensure that the cake layers stay securely in place, you’ll need to use frosting as a “glue” between each layer. Properly applying frosting ensures that your cake holds together without wobbling or sliding apart.
- Spread an Even Layer of Frosting: Once your first layer is in place, spread a generous but even layer of frosting on top. This layer should be thick enough to help seal the layers together but not so thick that it oozes out the sides when the next layer is added.
- Smooth the Frosting: Use an offset spatula to smooth the frosting and make sure it’s evenly distributed across the layer. You can also pipe a border of frosting around the edge of the layer to help contain any filling you might add, preventing it from spilling out.
- Repeat with Additional Layers: Continue stacking and frosting each layer until all the layers are stacked. After each addition, make sure the cake is level and aligned properly. If needed, press down gently to ensure the layers stick together.
5. Preventing Cake Shifting or Collapsing
When building a multi-layer cake, there is always the risk of the cake layers shifting or the entire structure collapsing. To avoid this, there are a few tips to keep in mind:
- Use Dowels or Cake Supports: If you’re stacking multiple layers, it’s a good idea to use dowels, cake straws, or other cake supports to provide extra stability. Insert the dowels into the cake after each layer, ensuring they are cut to the correct height and do not protrude above the cake. This prevents the upper layers from sinking into the lower ones, especially in taller cakes.
- Chill the Cake Between Layers: If you’re concerned about your cake layers shifting during stacking or frosting, refrigerate the cake for about 15 minutes between layers. This helps the frosting firm up and provides additional stability before you continue decorating or frosting.
- Support the Sides: While frosting, you can support the sides of the cake with a gentle hand or a cake collar (a strip of acetate or parchment paper) to ensure the frosting is even and the layers stay in place.
6. Finishing the Stack with Frosting and Decorations
Once your layers are stacked and the cake is structurally sound, it’s time to finish it off with frosting and unicorn-themed decorations.
- Crumb Coat: Before applying the final layer of frosting, spread a thin layer of frosting all over the entire cake. This “crumb coat” seals in the crumbs, preventing them from mixing with your final coat of frosting. Chill the cake for about 30 minutes to let the crumb coat set.
- Final Coat of Frosting: After the crumb coat has set, apply a thicker, more decorative layer of frosting. Smooth it out using an offset spatula or bench scraper for a polished finish.
- Add Unicorn Decorations: Once the cake is frosted and chilled, add the fun and whimsical unicorn details. This includes rainbow-colored piping, edible glitter, unicorn horn and ears, and any other creative elements you want to incorporate into your design.
7. Storing the Cake
If you’re not serving the cake immediately, proper storage is essential to keep it fresh and prevent it from collapsing.
- Store in the Fridge: Cakes with frosting and decorations should be stored in the refrigerator to keep the frosting firm. However, let the cake sit at room temperature for about 30 minutes before serving, so it’s easier to cut and the frosting has a softer texture.
- Cover Lightly: To avoid smudging the decorations, loosely cover the cake with plastic wrap or place it in an airtight container. Just make sure the decorations are protected and won’t get damaged.
Cooling and stacking your unicorn cake with care ensures that it remains beautiful, stable, and easy to decorate. By following these tips, you’ll avoid common pitfalls and create a perfectly stacked cake that’s ready for the most magical frosting and finishing touches!
Step 2 – Assembling and Frosting the Unicorn Cake
Stacking the Rainbow Layers
Stacking the rainbow layers of your unicorn cake is a crucial step that brings all your hard work and vibrant colors together into a visually stunning dessert. The goal is not only to make the layers look beautiful but also to ensure they stay structurally sound and aligned perfectly. Here’s a detailed guide on how to stack the rainbow layers with precision and ease:
1. Preparing the Stacking Base
The first step in stacking your rainbow cake is ensuring that you have a stable base to work from. A strong and sturdy foundation is key to a successful stack that won’t shift or collapse as you build up the layers.
- Cake Board or Cake Stand: Start by placing a cake board or sturdy cake stand on your working surface. The cake board acts as the foundation on which you’ll build your cake, offering support while keeping the layers aligned. Choose a board that’s large enough to accommodate your cake layers comfortably and ensure easy transport. If you’re using a cake stand, make sure it is sturdy enough to support the height and weight of the stacked layers.
- Apply a Layer of Frosting: To prevent the first cake layer from sliding, apply a thin layer of frosting to the cake board. This “glue” layer helps to keep the first cake layer in place. Spread the frosting evenly over the surface using an offset spatula, making sure it covers the entire area where the first layer will rest.
2. Start with the Largest Layer
If you’re making a multi-tiered unicorn cake with multiple sizes of cake layers, start by placing the largest layer at the bottom. This provides a sturdy base and ensures the stability of the cake as you stack more layers on top.
- Ensure Level Placement: As you place the first layer of cake on the cake board, make sure it is centered and sitting evenly on the board. Use a small level or eyeball the placement to ensure that the layer is straight and aligned. A crooked layer can throw off the entire look of the cake.
- Press Down Gently: After placing the first layer, gently press down to ensure the cake sticks to the frosting on the cake board. Be careful not to press too hard, as this could cause the cake to crack or break.
3. Apply Frosting Between Layers
One of the key elements in stacking a rainbow cake is ensuring that the layers are secured with frosting. This helps to stabilize the cake and creates a seamless transition from one layer to the next.
- Even Frosting Layer: After placing the first layer, use an offset spatula to spread an even layer of frosting on top of it. Be generous, but not too thick, as excess frosting can spill out when the next layer is added. The frosting layer helps to “glue” the layers together and ensures they stay in place during stacking. You can also use buttercream, cream cheese frosting, or any frosting of your choice.
- Smooth and Level: Once the frosting is spread, smooth it out with an offset spatula. This creates a uniform surface for the next layer and helps the cake stay level. If you’re using a thick layer of frosting, you may want to pipe a border of frosting along the edges to prevent the frosting from spilling out when the next layer is placed.
4. Repeat the Process for Each Layer
Now that the first layer is in place and frosted, it’s time to add the rest of your rainbow layers. Repeat the process of stacking each layer with frosting in between.
- Order of Layers: Place the next layer on top of the first, and repeat the frosting process. Work from largest to smallest, ensuring each layer is centered and straight. If you have multiple rainbow-colored layers, this is where the vibrant colors will begin to show, creating a stunning effect as the cake heightens.
- Align Layers Properly: It’s crucial to keep the layers aligned so the cake doesn’t end up leaning to one side. Always check that each layer is centered on the one below it. If needed, gently nudge the layers to ensure they’re in the correct position before pressing down.
5. Ensuring Stability with Dowels or Cake Supports
When stacking multiple layers, particularly with a tall cake, you’ll want to ensure that the weight of the upper layers doesn’t cause the cake to collapse. Adding dowels or cake supports is essential to maintain stability.
- Use Cake Dowels or Straws: Insert dowels or cake straws into the center of the cake once you’ve stacked your layers and applied frosting between each. These will help support the top layers, preventing them from sinking into the bottom layers. Depending on the height of the cake, you may need to add more than one dowel, spaced evenly throughout the cake.
- Trim Dowels to the Right Height: After inserting the dowels, use a serrated knife to trim them to the height of the top layer of cake. This ensures that the dowels won’t stick out from the top of the cake but will still provide ample support for the stacked layers.
6. Chill Between Stacking Layers (Optional)
If you’re stacking several layers or need to maintain a certain level of precision while stacking, it may be helpful to refrigerate the cake briefly between layers.
- Refrigerate for Set Frosting: After stacking a few layers and applying frosting, you may want to chill the cake in the refrigerator for 10-15 minutes. This helps the frosting firm up and makes it easier to stack additional layers on top without disturbing the structure. This also helps prevent the frosting from squishing out between the layers when more weight is added.
- Allow the Cake to Reach Room Temperature: After chilling, let the cake come to room temperature for about 20–30 minutes before continuing with further decoration. This helps soften the frosting and makes it easier to work with when you’re adding the final decorative touches.
7. Final Layer of Frosting
Once all the rainbow layers are stacked and secured, it’s time to add the final coat of frosting around the entire cake. This helps smooth out any imperfections and provides a uniform surface for any additional decoration.
- Crumb Coat: Apply a thin layer of frosting over the entire cake to seal in the crumbs. This “crumb coat” will prevent any loose crumbs from mixing with your final layer of frosting. Once the crumb coat is applied, refrigerate the cake for about 30 minutes to allow the frosting to set.
- Final Smooth Coat: After the crumb coat has set, apply a thicker layer of frosting to the cake, smoothing it out with a bench scraper or offset spatula. You can make the edges sharp or rounded depending on your preferred aesthetic.
8. Decorating and Adding Unicorn Elements
The fun part begins once the layers are stacked! Now it’s time to decorate your unicorn cake to make it truly magical.
- Add Unicorn Horn and Ears: Whether you’re using fondant or piped buttercream, create the magical unicorn horn and ears. Place the horn in the center of the top layer, and add the ears on either side for a whimsical, magical look.
- Piping Buttercream Decorations: Use colorful buttercream to pipe on decorative elements such as swirls, rosettes, or flowers around the cake. You can also pipe a rainbow of frosting along the edges or top of the cake to enhance the vibrant, multi-colored look of the unicorn cake.
- Finish with Edible Glitter: To give your unicorn cake a magical sparkle, finish by dusting edible glitter or shimmer dust over the cake for a whimsical effect.
9. Final Checks and Serving
Before serving, do a final check to make sure the cake layers are perfectly aligned and the decorations are securely in place. If you’ve used dowels, make sure they aren’t visible or protruding. If you’re serving the cake immediately, cut it carefully with a sharp knife to ensure neat slices that reveal the beautiful rainbow layers inside.
Stacking your rainbow layers with care and precision is essential for creating a stunning unicorn cake. By following these steps, you’ll have a multi-colored, multi-layered masterpiece that will not only impress your guests but also stand strong and stable throughout the entire decorating and serving process.
Creating a Smooth Buttercream Finish
Achieving a smooth buttercream finish on your unicorn cake is key to giving it a polished, professional look. A smooth, flawless buttercream surface serves as the perfect canvas for further decorations and enhances the overall aesthetic of your cake. However, this step can be tricky, and achieving that perfect smooth finish requires a combination of technique, patience, and the right tools. Here’s how to create that smooth buttercream finish for your unicorn cake, step by step.
1. Preparing the Buttercream
Before you even start spreading buttercream on your cake, it’s important to prepare it correctly. The consistency of your buttercream is vital for achieving a smooth finish.
- Choosing the Right Buttercream: The two most common types of buttercream for smooth finishes are American buttercream and Swiss meringue buttercream. While both can work, Swiss meringue buttercream is often preferred for its silky texture and smooth finish. However, American buttercream, with its sweet flavor and ease of preparation, is more commonly used for cakes like unicorn cakes.
- Achieving the Right Consistency: Your buttercream should be smooth, fluffy, and easy to spread but not too soft or runny. If your buttercream is too stiff, add a small amount of milk or cream (about 1 teaspoon at a time) to loosen it up. If it’s too soft or runny, add powdered sugar to thicken it. The right consistency will allow you to spread it easily over the cake without it sliding off or being too thick and difficult to smooth.
2. Crumb Coat Your Cake First
The crumb coat is a thin layer of buttercream that acts as a base to seal in the crumbs and create a clean, even surface for your final layer of buttercream.
- Apply the Crumb Coat: After stacking your rainbow layers, start by applying a thin layer of buttercream over the entire cake. Use an offset spatula to spread the buttercream over the cake, covering the top and sides. Be sure to apply just enough to seal in any crumbs, but don’t worry about making it perfectly smooth at this stage.
- Smooth It Out: After applying the crumb coat, use your offset spatula to smooth it out as much as possible. It’s okay if it’s not perfect—this coat is just to create a stable base for the final layer of frosting.
- Refrigerate for 30 Minutes: After applying the crumb coat, chill the cake in the fridge for about 20-30 minutes to set the buttercream. This step will firm up the crumb coat, preventing crumbs from mixing into your final layer of frosting.
3. Applying the Final Buttercream Layer
Once your crumb coat is set, it’s time to apply the final, thicker layer of buttercream. This layer should be smooth and even to create that flawless, professional finish.
- Use an Offset Spatula: When applying the final layer of buttercream, use a clean offset spatula. Apply generous amounts of buttercream to the top and sides of the cake, focusing on one section at a time. Add buttercream to the top first and then work your way down the sides. Aim to cover the entire cake evenly with a layer of frosting.
- Smooth Over the Surface: After covering the cake with buttercream, use the offset spatula to start smoothing out the frosting. Hold the spatula at a slight angle and gently pull it across the surface. Start from the top and work your way down the sides. This will help eliminate any visible lines or imperfections and create a more even surface. If the buttercream starts to pull, warm the spatula by dipping it in hot water, then drying it off before smoothing again.
4. Using a Bench Scraper for a Perfect Finish
A bench scraper (also called a cake smoother) is a great tool for creating a perfectly smooth and even finish on the sides of your cake.
- Smooth the Sides: Once you’ve applied your final buttercream layer, place the bench scraper on the side of the cake, holding it perpendicular to the surface. Slowly spin the cake while gently pressing the bench scraper against the cake. This will help to remove any excess frosting and smooth the surface.
- Work in Sections: If you find that the buttercream is starting to get too soft or sticky, you can refrigerate the cake for a few minutes to firm it up. Then, return to smoothing with the bench scraper. Work in sections, starting from the bottom and working your way up for a cleaner finish.
- For Crisp Edges: If you want sharp, clean edges on your cake (as opposed to rounded ones), use the bench scraper to smooth the frosting until it’s even and perpendicular to the top of the cake. For rounded edges, simply use the scraper to smooth the frosting, but don’t press as firmly.
5. Hot Water Method for a Glass-like Finish
For a truly glass-like, flawless buttercream finish, you can use the hot water method to smooth your frosting even further.
- Heat the Spatula: Fill a cup with hot water and dip your offset spatula into it. Wipe the spatula dry with a clean towel. The heat from the spatula helps to melt the outer layer of the buttercream slightly, making it easier to smooth and create a sleek, glass-like finish.
- Smooth in One Motion: After dipping your spatula in hot water, gently run it over the surface of the buttercream in one smooth motion. The heat helps to create a smooth and even finish, especially for cakes that require a more polished look. Repeat as needed, reheating the spatula each time.
6. Final Touches and Polishing
Once you’ve achieved a smooth finish, it’s time to add the final touches that will enhance the look of your unicorn cake.
- Cleaning Up the Edges: If there are any imperfections or frosting that has spilled over the edge of the cake board, gently wipe it off with a damp cloth or paper towel to clean up the edges. This ensures a crisp, neat finish around the base of the cake.
- Allow the Buttercream to Set: Once your cake is smooth, allow it to sit at room temperature for about 15 minutes before decorating. This allows the buttercream to firm up and set in place, making it easier to decorate without smudging the frosting.
- Polishing the Top: For an extra shine, you can lightly coat the top of the cake with a very thin layer of melted butter or vegetable shortening. This will give it a glossy, shiny finish without affecting the overall appearance.
7. Decorating Your Smooth Cake
Now that you’ve created a beautiful, smooth buttercream finish, your cake is ready for the next step: decoration!
- Adding Unicorn Details: Use smooth, brightly colored buttercream to pipe rosettes, swirls, or even small flowers on the top or sides of the cake.
- Unicorn Horn and Ears: Decorate the top with a fondant or buttercream unicorn horn and ears.
- Sprinkles and Edible Glitter: For that magical unicorn look, finish the cake off with sprinkles, edible glitter, or small fondant decorations.
Conclusion
Creating a smooth buttercream finish for your unicorn cake is a multi-step process that requires patience and precision. With the right tools, techniques, and attention to detail, you’ll be able to achieve a flawless, glass-like buttercream surface that acts as the perfect base for all your whimsical unicorn decorations. Whether you’re a beginner or an experienced baker, mastering the smooth buttercream finish will take your cake decoration skills to the next level!
Piping Magical Unicorn Designs
Piping magical unicorn designs is one of the most fun and creative parts of making a unicorn cake. This is where you can let your imagination run wild and transform your cake into a beautiful, whimsical masterpiece. Piping unicorn designs requires precision, patience, and the right piping tips to bring your vision to life. Whether you’re aiming for a magical unicorn horn, vibrant swirls, or intricate flowers, mastering these piping techniques will elevate your cake’s appearance to another level. Here’s how to pipe stunning unicorn designs that will enchant everyone who sees them.
1. Choose the Right Piping Tips and Tools
The first step in piping unicorn designs is selecting the right tools. The variety of piping tips available can make a huge difference in the texture and appearance of your designs.
- Piping Tips: For most unicorn cake designs, you’ll need a variety of piping tips to create different textures and effects. Some of the most commonly used piping tips for unicorn cakes include:
- Star Tip (Wilton 1M or 2D): Perfect for creating swirls, rosettes, and piping large unicorn manes. This tip allows you to create textured, fluffy designs with a lot of volume.
- Round Tip (Wilton 2, 3, or 4): Ideal for outlining, writing, or creating smaller details such as the unicorn’s eyes and facial features.
- Leaf Tip (Wilton 67): Great for creating leaves or feathered effects for the unicorn’s mane or other decorative elements.
- Petal Tip (Wilton 104): Perfect for creating delicate flowers or petals that can be used in the unicorn’s mane or as decorative accents.
- Piping Bags: Use high-quality piping bags, preferably reusable ones, for a more controlled flow of buttercream. You can also use disposable piping bags, but make sure they are durable enough for intricate piping work. A bag with a coupler system will allow you to easily switch out different piping tips as you decorate.
- Couplers: A coupler is a small attachment that lets you change piping tips without changing the bag, making it easier to work on different parts of the design without reloading the bag each time.
2. Color Your Buttercream for a Magical Effect
For a unicorn cake, vibrant colors are key to achieving the magical look. Use gel food coloring to create the perfect rainbow effect in your piping designs.
- Divide Your Buttercream: Start by dividing your buttercream into separate bowls. You will need different colors for various parts of your unicorn design, such as the mane, flowers, and horn.
- Color the Frosting: Use gel food coloring to color each portion of the buttercream. Gel colors are preferred because they provide intense color without thinning out the buttercream. Choose colors that reflect the vibrant, whimsical colors of a unicorn, such as pastel pink, lavender, mint green, baby blue, and sunshine yellow.
- Mix Thoroughly: Once the color is added, mix the buttercream thoroughly until the color is even and vibrant. You can create gradient effects by mixing different amounts of color into each bowl of frosting, which will give your unicorn mane a more magical, multi-colored look.
3. Piping the Unicorn’s Horn and Ears
The unicorn’s horn and ears are some of the most important features of your cake and should be a focal point in the design. Here’s how to pipe these magical elements.
- Unicorn Horn: You can pipe the unicorn horn with buttercream using a small round piping tip (like Wilton #3) to create a spiral effect. Start at the base of the horn and slowly work your way up in a spiral motion to form the iconic cone shape of the unicorn horn. Once piped, you can add edible glitter or gold-colored edible paint for a magical, shiny effect. If you prefer, you can also create the horn using fondant or gum paste for a more structured, 3D effect.
- Unicorn Ears: To pipe the unicorn’s ears, use a small petal piping tip like Wilton #104. Pipe two small petals of buttercream on top of the cake, one for each ear. You can make them in pastel colors like pink or white, then add some fondant or buttercream details for the inner ear shape. A small round tip (like Wilton #3) is ideal for adding the inner ear details with a different shade of buttercream.
4. Piping the Unicorn’s Magical Mane
The unicorn’s mane is where you can get really creative with your piping! The vibrant swirls and curls of the mane add volume, texture, and color to the cake.
- Start at the Top: Begin piping the unicorn’s mane at the top of the cake near the horn. Use a large star tip (Wilton 1M or 2D) to create large, fluffy rosettes and swirls in various colors. Work in sections to cover the entire top and sides of the cake, layering the colors to mimic the flowing, voluminous mane of a unicorn.
- Piping Swirls and Rosettes: To create a swirl, hold your piping bag at a 90-degree angle and apply pressure while moving your hand in a circular motion. For rosettes, simply pipe a small swirl and then continue piping in a tight circle, layering the buttercream. Alternate the colors to create a beautiful ombre or rainbow effect in the mane.
- Creating Volume: To add texture and volume to the mane, use the star piping tip to pipe thicker, more defined rosettes along the edges of the cake. You can overlap some of the rosettes to create a flowing, cascading effect, making the mane look fuller and more dynamic.
5. Adding Flowers and Other Decorative Elements
To give your unicorn cake a more magical and detailed look, you can pipe small flowers, stars, and other whimsical elements around the mane and cake. These delicate additions can help tie the theme together and give the cake a more polished, intricate appearance.
- Flowers and Leaves: Use a petal piping tip (Wilton #104) to pipe simple flowers around the mane. Create small, delicate flowers by piping one large petal and layering smaller ones on top. Add leaves around the flowers using a leaf piping tip (Wilton #67) to complete the floral elements.
- Stars and Glitter: For added sparkle, pipe small stars using a small star tip (Wilton #16). These can be scattered along the sides of the cake or around the horn. You can also add edible glitter or edible pearls to make the cake shimmer and shine like a magical unicorn.
6. Piping the Unicorn’s Face
The face of the unicorn is an important element that adds personality and charm to the cake. You can pipe simple yet cute details to bring the unicorn to life.
- Eyes: Use a small round tip (Wilton #3 or #4) to pipe the unicorn’s eyes. Start by piping a small dot for the iris, then pipe a slightly larger circle around it for the eye. Add a tiny white dot for the eye’s sparkle, and if desired, outline the eye with a darker color like black to create definition.
- Nose and Mouth: Pipe a small curved line with a round tip to create the unicorn’s nose, then add a tiny, upward-curved mouth. You can also use a small heart shape to add extra cuteness to the face.
7. Final Touches and Polishing
After piping the main designs, take a step back and assess your cake. Add any additional touches or details that will enhance the overall design, such as tiny flowers, stars, or more swirls of buttercream.
- Polishing the Details: Use a small brush to gently smooth any rough edges in the buttercream or add more glitter for extra sparkle. If needed, you can also use edible pearls or sugar crystals to accentuate certain parts of the unicorn’s mane or face.
Conclusion
Piping magical unicorn designs is a delightful part of decorating a unicorn cake, offering endless opportunities for creativity. By using different piping tips and techniques, you can craft a magical unicorn horn, create a vibrant rainbow-colored mane, and add whimsical details like flowers, stars, and delicate facial features. With a little practice, your unicorn cake will come to life in the most enchanting way, perfect for birthdays, parties, or any occasion that calls for a bit of magic!
Adding Final Details
Adding the final touches to your unicorn cake is the most exciting part of the process. It’s your chance to let your creativity shine and transform a beautifully baked and frosted cake into a magical masterpiece. These finishing details are what make your unicorn cake stand out, turning it from a simple dessert into a centerpiece worthy of admiration. Here’s how to enhance your cake with the perfect final elements.
1. Accentuate with Edible Glitter and Shimmer Dust
Nothing screams “unicorn magic” more than a touch of sparkle. Edible glitter and shimmer dust can instantly elevate your cake’s appearance by adding a radiant, magical glow.
- How to Apply Glitter: Use a clean, dry brush to lightly dust edible glitter onto the unicorn’s mane, horn, and ears. You can also sprinkle glitter on any flowers, stars, or decorations to make them pop. Avoid overloading the glitter to maintain a delicate look.
- Types of Glitter to Consider:
- Fine glitter for a subtle shine.
- Chunky glitter for bold sparkle on larger areas like the mane.
- Pearlescent dust for a soft, elegant shimmer, perfect for the cake’s surface or edges.
2. Add Textural Elements with Edible Pearls and Sprinkles
Edible pearls and sprinkles are small but impactful details that can add dimension and texture to your cake.
- Placement Ideas:
- Scatter edible pearls along the edges of the unicorn’s mane or horn.
- Use pastel or iridescent sprinkles around the base of the cake for a playful finish.
- Create a starry effect by dotting the cake with star-shaped sprinkles.
- Pro Tip: Use tweezers to place pearls or intricate decorations with precision. This ensures even spacing and a polished look.
3. Enhance with Fondant Decorations
Fondant is a versatile medium that allows for intricate and personalized details. You can create flowers, stars, or even tiny butterflies to decorate your cake.
- Creating Fondant Flowers:
- Roll out colored fondant and use flower cutters to shape roses, daisies, or other blooms.
- Add details like veining with a shaping tool or create layered petals for realism.
- Using Fondant for Unique Details:
- Shape fondant into clouds, rainbows, or other unicorn-themed elements.
- Add metallic touches by brushing edible gold or silver dust onto the fondant decorations.
4. Perfect the Unicorn’s Face
The unicorn’s face is the focal point of your cake, and it’s important to make it as charming and whimsical as possible.
- Eyes: Use black fondant, royal icing, or food-safe markers to create closed eyes with long lashes. For an extra magical effect, add a touch of white icing to the eyes to mimic a sparkle.
- Nose and Smile: Pipe a small, heart-shaped nose and a delicate smile with pink or black buttercream.
- Pro Tip: Symmetry is key. Use a template or draw light guidelines to ensure the facial features are evenly spaced.
5. Add Metallic Accents
Metallic elements like edible gold or silver can give your cake a luxurious finish. Use them sparingly to highlight key areas.
- Gold and Silver Leaf: Apply edible metallic leaf to the horn, edges of the mane, or even along the base of the cake for an elegant touch.
- Metallic Dust: Brush edible gold or silver dust onto the unicorn horn, ears, or fondant accents.
6. Dress Up the Cake Board
A decorated cake board enhances the presentation and ties the entire look together.
- Creative Ideas: Cover the board in a pastel-colored fondant or use glittery paper for a magical effect.
- Personalization: Write a name, message, or special date on the board using edible markers or icing.
7. Present with Style
The way you display your unicorn cake can make all the difference in how it’s perceived. Use a cake stand or pedestal to elevate the cake and draw attention to its intricate details. Surround the cake with themed decorations, like mini unicorn figurines or colorful confetti, to complete the magical atmosphere.
By taking the time to add these final details, you’ll create a unicorn cake that’s as delightful to look at as it is to eat. These small, thoughtful touches will ensure your cake is a showstopper, leaving a lasting impression on everyone who sees or tastes it!